Self Publish Your Book on Amazon, Step By Step Guide [2022]

Today, I just want to write about how to self publish your own book on Amazon, using KDP, Kindle Direct Publishing, which is Amazon’s free self publishing service. There was an outdates version on our blog and we updated it here for 2021. I’m going to show you how to publish a Kindle version of your book, as well as a paperback version of your book. 

Now, the cool thing about KDP is that anybody can publish a book on Amazon, for free, Amazon’s provided the opportunity for anyone, you don’t have to be an expert, you don’t have to be a best selling author, you don’t have to be, you know, have this incredible talent. If you have a message, if you have something that you want to put out there in the world, and you want to publish it on Amazon, you can do that and you don’t have to go through a traditional publisher. 

And that whole big process of what used to be, Amazon’s really changed the landscape so that it’s an equal playing field for everybody. If you live in India, if you live in Australia, Canada, US, Europe, Brazil, wherever you live in the world, you can leverage their platform, and you can publish almost anything that you want, whether it’s a shorter book, a longer book, Kindle paperback, the paperback platform they have is print on demand, which is pretty amazing. 

You don’t have to order a lot of inventory, and store that in a warehouse and ship it every time someone buys your book, the print on demand service that KDP has is when someone buys your book on Amazon, then they automatically print it and ship it to the customer on your behalf. So Amazon’s pretty amazing. They have millions of customers on their platform, and they provide an incredible opportunity for you. 

And the other cool thing is they make it very easy and very fast for you. In fact, if right now, you already have the file of your book, it’s already ready to be published on Amazon, and you have the cover of the book, you can go to this process in a matter of minutes, and hit the publish button. And your book will be live available for sale on Amazon within about 72 hours. 

But usually it’s about 24 to 48 hours. So if you’ve got all that ready, fantastic, you’re good to go, this video is going to help you with that. And if right now you don’t have a book, you don’t have a cover, I’ll show you some options on how you can hire a graphic designer to design a cover for you rather inexpensively. Or you can hire people to edit to proofread. Even to write the book for you. 

Keep also in mind that there are a lot of publishers out there that hire authors, work with authors and writers or ghost writers to create a book and publish it on Amazon. So that could be an option for you as well. So with that being said, let’s dive in. 

STEPS TO PUBLISH YOUR BOOK ON AMAZON

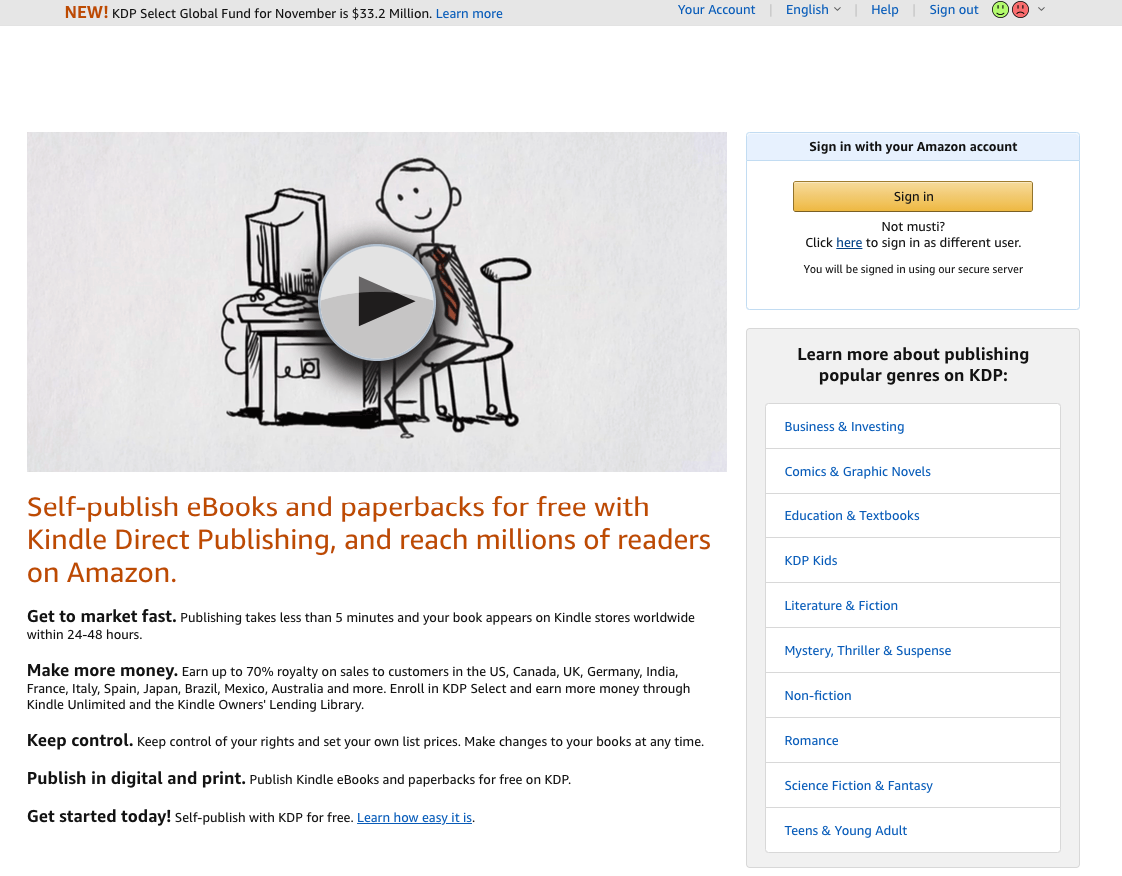
First, go to https://kdp.amazon.com, known as Kindle Direct Publishing, it’s Amazon self publishing platform. It’s free to sign up, you just need an Amazon account. If you don’t have one, you can click on sign up. If you already have a personal Amazon account, I’d recommend setting up a separate one just for business and self publishing, you do need a different email address for that. 

Here you can see some of the benefits publishing takes less than five minutes, your book appears on Kindle stores worldwide within 24 to 48 hours, you earn up to 70% royalty through their platform. And you can publish your book worldwide. So in the US, Canada, UK, Germany, India, France, Italy, Spain, Japan, etc. And of course, they allow you to publish the print version as well, which is really cool. When you log inside KDP you’re going to see the dashboard.

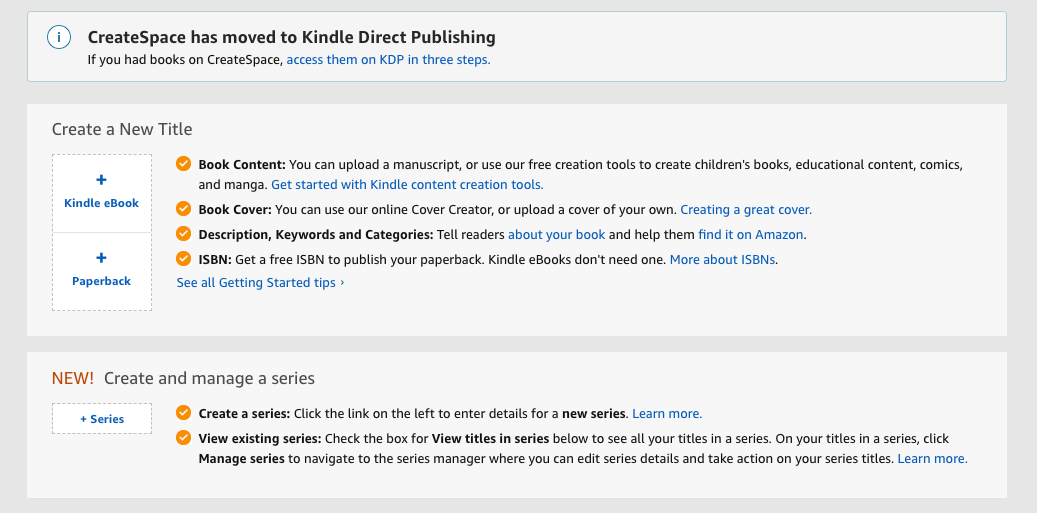
If you click here on the bookshelf, you can view all the books that you’ve published under your KDP account. Reports give you the data sales data, royalties, a lot of information about your books and how they’re performing, I encourage you to play around and browse their website and platform. 

But if you’re ready to publish your book, you’re going to click here for the Kindle ebook. Kindle is a little bit easier and faster than a paperback book. Because with a Kindle book, all you need is you need the book file in this specific format that’s required. It could be a doc file from like MS Word. And you’re also going to need the cover and the cover is going to be a flat cover that meets the dimensions of what they require. 

But that’s all you need to publish as a Kindle version paperback. On the other hand, you do need to format it for paperback but you also need a back cover and also a spine. So for example, the back cover of the book and the spine of the book is also going to be a requirement for that. ways you can get that done is hiring a graphic designer that can do that for you. 

BOOK COVER, TITLES, DESCRIPTION AND KEYWORDS MATTER A LOT

With a book title, of course, you want to make sure it’s catchy. Something grabs people’s attention when they see it, when they hear it. They say to themselves, I want to know more, they want to click. Here is an article that may give you some inspiration.

And if you’re trying to use Amazon search to optimize your book for different keywords, because Amazon’s a search engine, people go there that typing keywords to search for, that’s how they can find your book organically to buy it, then you might want to learn a little bit about different keywords that you can put in your book title that will help your book rank higher for those keywords, and attract more potential customers that come down here. Here is a step by step article to master Amazon kindle keyword research.

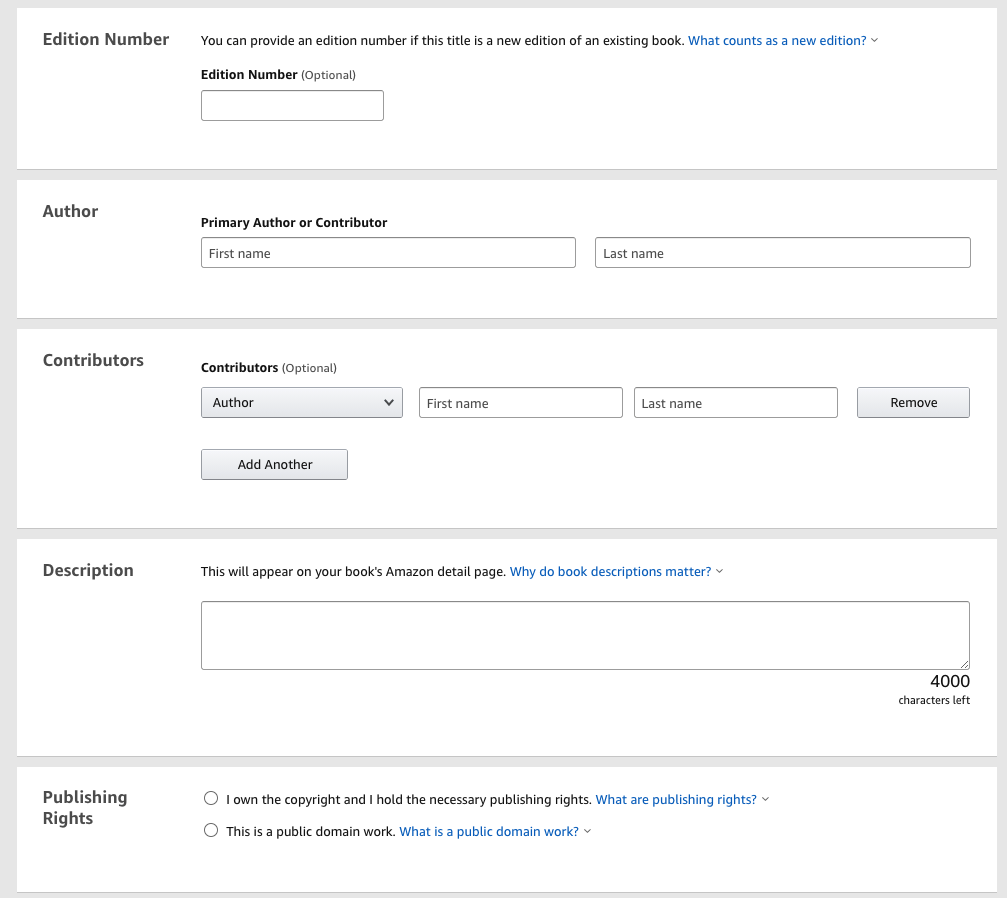
The edition number I’m going to leave blank that’s optional. For the primary author and contributor field, this would be the author name, this could either be your name, it could be a pen name, or pseudo name, it can really be any name that you want. This is something that is an option. For a lot of authors, a lot of publishers, Mark Twain is a pseudo name, a lot of celebrities have changed their names, for branding purposes and what it’s not their legal board name. 

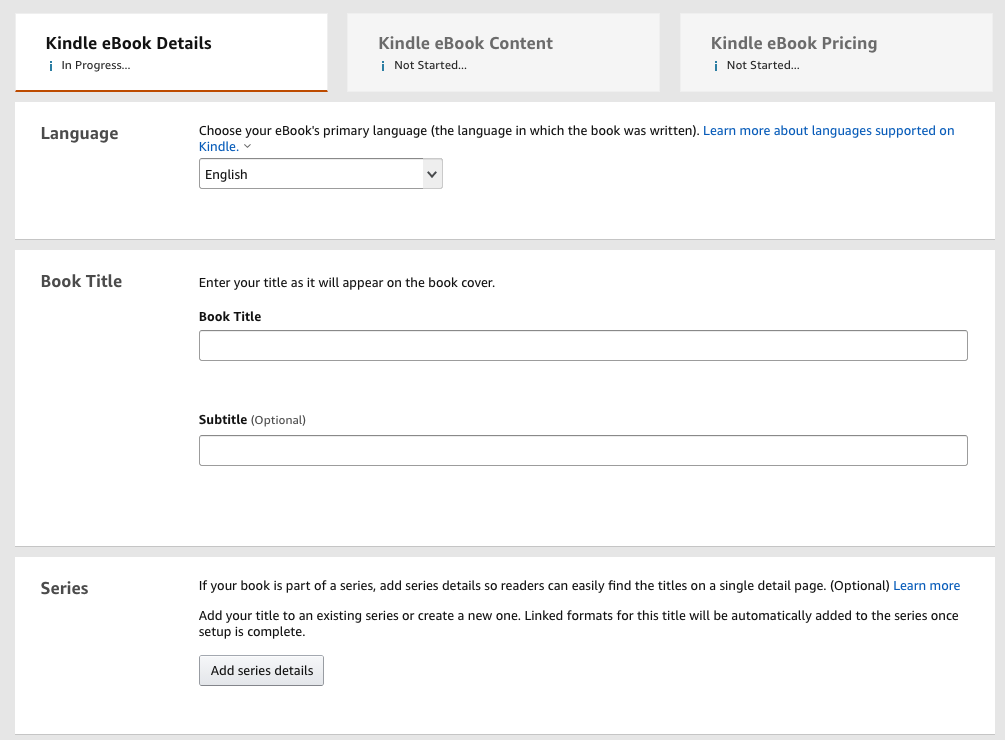
So there’s an option there too, if you want to be anonymous or published under a different name, you’re free to do that. But you’re also able to also include any contributors as an option so if you want to, you know if you’re the publisher, and then there’s another author that wrote the book, and they have the rights to it, then you can use their name. If you have like an illustrator, editors, anything else you want to include, you could include that here as well. It’s all optional, but you do need to have a primary author or contributor name. 

Then system will ask for the book description, you have 4000 characters to write up a book description, you don’t have to use all 4000, although the more space that you use, and the more that you include here, it can help with the ranking of your book, even people finding your book in Google, based on different keywords that you might have here in the description. But the primary purpose of the description is for those that want to know more about the book before they buy it. So you want to share more about the book, perhaps what inspired you to write it or what they’re going to learn about the benefits of buying the book, you can include that here to intrigue someone and to get them to want to buy your book. 

So this is kind of like a sales copy area of where you’d try to sell people on why they should buy your book. I always like to include a call to action at the end of any sales copy. So just this last piece, get your copy today by clicking the buy, buy now button right now, having that CTA that call to action will direct people to go and buy the book. 

Here are the publishing rights. So you want to determine either if you own the rights, or if it’s public domain work. I’m going to click here, I own the copyright and hold the necessary publishing rights. If you wrote the book yourself, you’re gonna own the rights to it. If you hired a ghostwriter, and you pay them, you can make sure that you own the rights to the book, so they’re selling the rights to you. There’s also some instances of books that are public domain, anybody can republish, and if that’s the case, you’d want to select this here. 

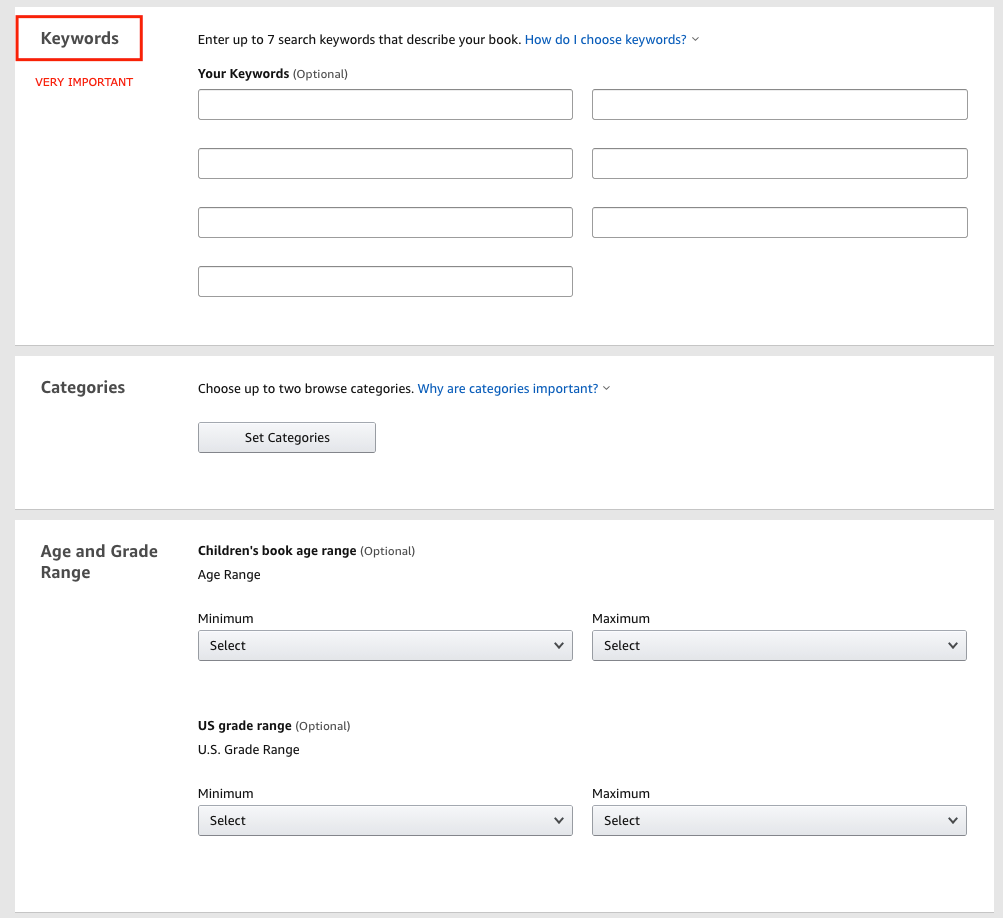
Now is the keywords, keywords help people find your book in Amazon search, you can put up to seven keywords. I do recommend that you use it and that you use all seven, you want to use the keywords that are relevant to your book. So think what keywords when someone searches to find my book on Amazon, for your book, use all of them as that gives yoıu more chances to get listed on search results relevant to your niche. This article explains how to remove guesswork from your research.

Choosing the right keywords is very important because if you choose keywords and your book ranks for those, then you can attract more customers of your book. And knowing which keywords to target based on which ones are in high demand, which ones are getting a high search volume is important because if you choose some keywords that no one’s searching for, or that might be too competitive that even if you put that as a keyword, there’s no chance someone’s going to find you for that keyword then it’s kind of a waste of space using that. And so you really want to optimize your listing for the right keywords, the best ones and sometimes you have to come back and test different ones. You know once you publish your book, see where rank for different keywords. 

And you can come back and play around with that a little bit. There are some tools and software that help you do research on Amazon, to identify keywords and give you suggestions, and even share with you how much money certain keywords are making for certain authors and publishers of their book.

Next, you can choose up to two different categories. Categories are very important because this is where your book is going to rank and be listed in a variety of different categories on Amazon. And you can rank as a best seller in those categories as well. 

So each of these categories has a best seller list. And some categories are easier to rank in than others, they’re less competitive, and others are a lot more difficult. But different categories. Depending on who you’re trying to attract, it’s going to make a difference in potential sales that you’re going to get as well. So here I can choose fiction, nonfiction. This is a nonfiction book, you can see there are many different subcategories.

And now, you are ready to release my book now. Or I want to make it available for pre order, pre orders great if you want to release her book at a certain date in the future but you want to take pre orders right now, which can be useful to get some sales early to have a successful launch of your book. So if you’re good at marketing, and you have a launch strategy, you might want to set it as preorder. 

DO YOU NEED FORMATTING FOR YOUR MANUSCRIPT?

Next we’re on the section of the manuscript. This is your book that you’re going to upload to KDP and upload as a Kindle book so that it can be live on Amazon. It’s going to have some content guidelines, you might want to review to make sure that your book is compatible with what they require. You want to choose whether or not you want to enable digital rights management DRM, this basically means that you’re gonna allow people to unauthorized distribution of your book, you want people to be able to lend your book you may or may not. 

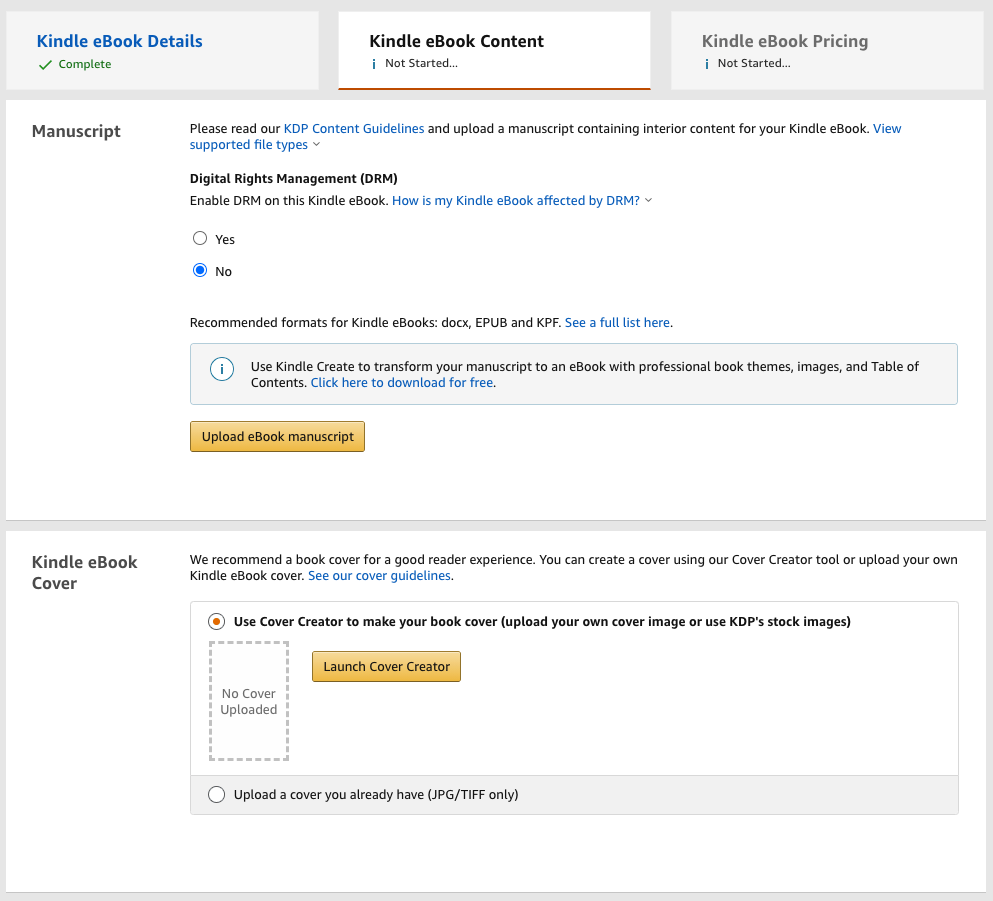
But when people download a Kindle book, they can lend it to someone or they can gift it to someone as well. But this is something you might want to know, review and decide which one you want to go with. 

In terms of the ebook manuscript, this is going to be the book file. The format’s they accept are doc x, that’s like Microsoft Word. doc file, ie pub, or kpf. So you can choose which format you want to to upload it as they do have their own platform to help you format your book yourself if you’d like. Or I’d recommend hiring someone to help you with that, because you want to make sure your book looks good on a Kindle ereader device and the formatting of it on a Kindle device is going to be a little bit different than on a paperback. 

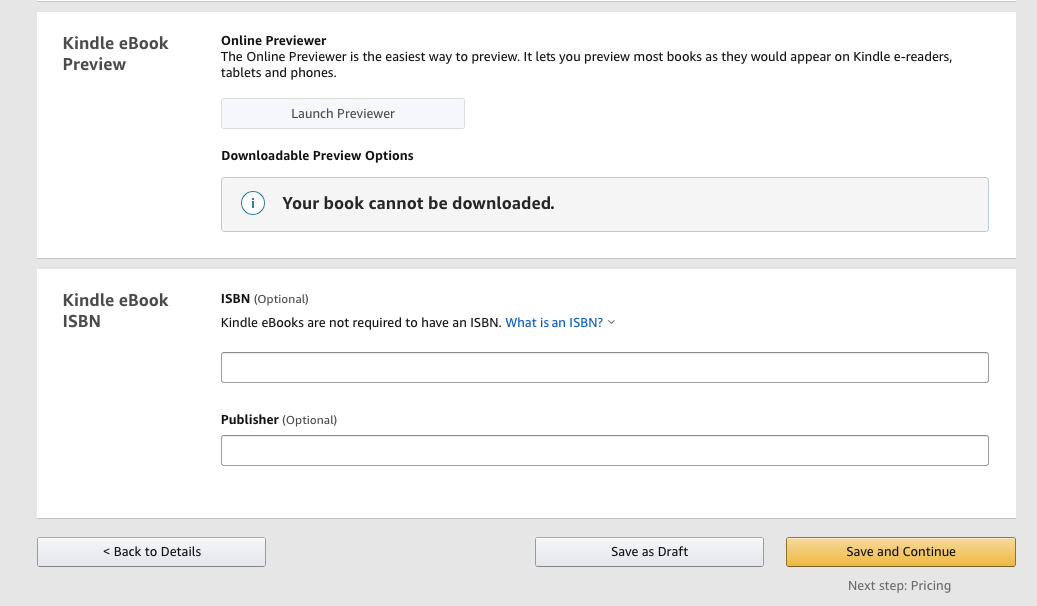
Usually, for example, the Kindle version might have less pages and paperback because even on a Kindle device, someone can actually choose what size of font they want to use. And there’s a variety of factors that affect the length of the book. Kindle has their own formatting platform, which I can link to and share essentially right here. Kindle create is the one that can help you. After uploading your manuscript you are able to preview it, which is useful because I can preview it to see how it looks on a Kindle e reading device. Before I publish it, you want to make sure that you do preview your book to make sure there’s no errors or mistakes. Because otherwise that will lead to negative reviews, Kindle ebook cover, so here you need the file of your cover. Check this article for book cover design. The cover and the title are going to determine for the most part, whether someone buys your book or not, the cover must stand out to someone when they’re scrolling through Amazon. 

You can include table of contents, in your Kindle book, you can make it clickable. So when you include your table of contents, someone can click on it, and go to that chapter of the book. So that’s something that you could do for your book.

ISBN is optional. That’s something that is required for a paperback or hardcover print book, you’ll get that when you publish the paperback. The print cover, which we’ll get to in a bit is optional. You can put it here if you’d like. 

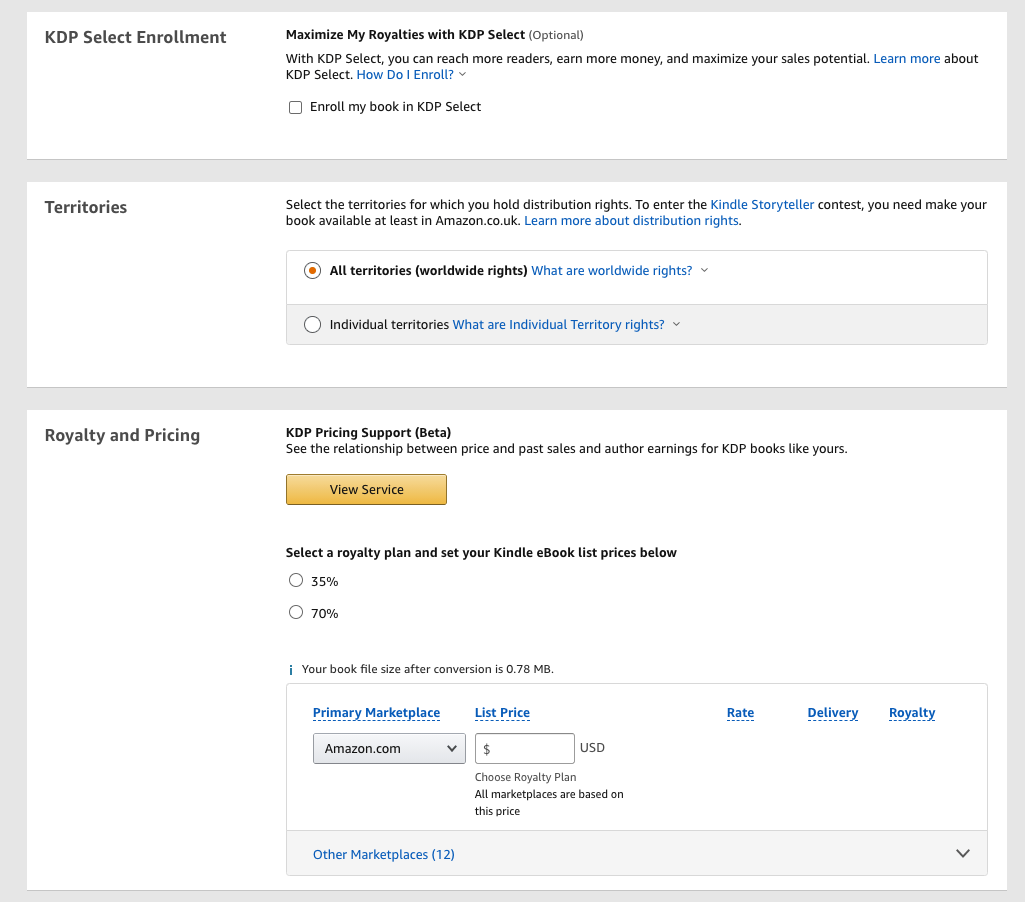
The next piece is KDP Select enrollment KDP Select is a program that you can enroll your book in with Amazon, which means that your book becomes exclusive on Amazon so it can’t be sold anywhere else. But on Amazon. And that is a contract that you agree to for 90 days and can always renew. In doing so you get certain benefits. For example, you can get more and more royalties because you can have your book. 

As part of a Kindle unlimited program, you can run a free promotion for your Kindle book, you can do a Kindle countdown deal, which allows you to offer a discount for your book for a limited time. They give you a lot of cool features and benefits to help market your book. It depends if you are planning on distributing this book on other platforms or selling it on your website. In that case, you can’t use this feature. 

HOW TO PRICE YOUR KINDLE BOOK?

But if you’re just going to stick to Amazon, I’d recommend enrolling in KDP Select territories as you decide where you want your book to be available on Amazon who can buy the book, you can select all territories worldwide or individual ones. So you can select all the individual countries that you want to make your book available, I suggest Worldwide.

Next is the royalty and pricing. So as you can see, they have two different pricing structures for a Kindle book. There’s 35% royalty, which means your book has to be sold in a certain price range from 99 cents to $200. Right here, but if you want the 70%, Amazon incentivizes you to sell it for 2.99 to 9.99 USD because they’ve determined that’s how they want to price books on their platform. 

If you select 2.99USD for example, you will get about $2.07 royalty delivery fee is three cents, and that depends on the size of the book. So the more the bigger the file size, then the more it’s going to cost for delivery, which is pretty much not much. I can also choose the other marketplaces. So here I can choose the price in India, the UK, Germany, France, Spain, Italy, etc. Right now is automatically being adjusted based on the US dollar price which is on amazon.com that’s a US marketplace. 

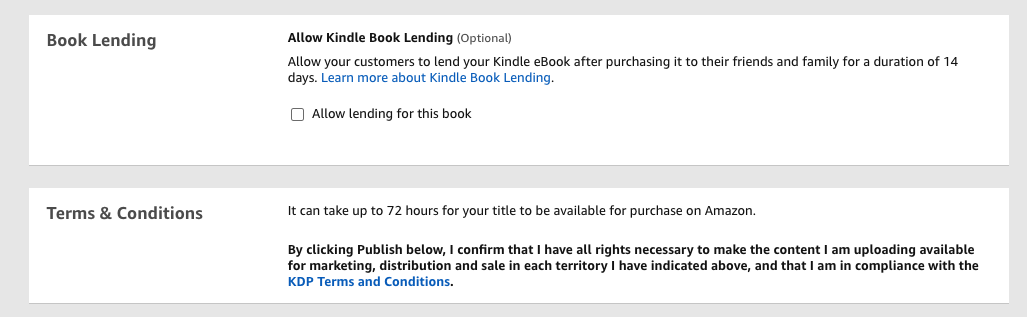
But people who want to buy it in India, UK, other countries, you can select the price for that in their currency. For book lending If you want to allow people that buy your Kindle book to lend it to other people, you may want to allow. Usually, it usually takes about 24 to 40 to 48 hours for your book to go live. Amazon sends you an email once it is live. 

And once your book is live on Amazon, you’d go to amazon.com, or whatever Amazon country’s platform and do a search for your book to make sure it is in fact live. Sometimes it might take a little bit longer, but it’s pretty rare. Your books should be there up on Amazon, and you can kind of see where it ranks for its keywords. You know that you selected and play around with that. 

But usually how Amazon will rank a book is based on the sales of it. So not just the keywords, but the more sales you get for your book, the higher it will rank for those keywords. So keyword optimization and marketing your book on Amazon is a very different strategy. 

PUBLISHING PAPERBACK VERSION

If you’re ready to publish your book as a paperback version, you’re going to come back to your bookshelf section of your Kindle dashboard. And you’re going to click on Create paperback with the draft of what you already set up. You do not need to fill in all the previous details, all you really got to do is to make sure everything looks good. Click on Save and Continue. 

Here’s where you get the ISBN. So you can just click here to assign a free, assign me a free ISBN. With the print options, they do have different options for that. Because it’s a print on demand service, whenever someone you know purchases the book on Amazon, they’re going to print it based on what you select here as the options. So you can select the interior and paper type, such as black, black and white interior with cream paper, or white paper or premium color. 

Of course, when you go higher quality with color, for example, it’s going to cost more money for them to print it for you. So that does cost more by using those options. The trim size is basically the trim around the book, the standard is six by nine inches, but you can select a different size. This information is important when you format your book. Because when you let’s say work with a designer, you’re going to give them this information. 

And everything else is going to set up as you did with the KDP, the Kindle version, and then you’re ready to set the price and then publish it on Amazon. If you want to get someone to write your book for you, and do the research of it, or if you want someone to proofread, edit, even find designers: the website I’d recommend for you is called Upwork (upwork.com). You can post a job and have people from all over the world bid on that. And it’s one of my go to places to find writers, editors, Proof Readers to support me.

I hope you enjoy this article and subscribe to our email newsletter for more. 

All the best.

Melissa Mayer

PS: I also prepared a Book Promotion Guide that you can combine with your keyword strategy to make your book a success.

PPS: You may find our Indie Author Checklist useful in your self-publishing journey.

All the best, Melissa Mayer.

AVOID COSTLY MISTAKES WHEN ORDERING BOOK COVERS

The book cover is the part of book publishing that is most common for micro publishers to hire an outsider to do. Here I have collected tips to become a better book cover customer, something that can save you money and give you a better end result. Please supplement the text with the information contained in my manuals or something I have previously written about book covers.

A professional book cover gives your book a better chance

The book cover, more specifically the front page, should not only convey who wrote the book and what the book is called. The front page will get the prospective reader to click from the online bookstore, grab it in brick and mortar bookstore or pick it up at a trade show. It is not enough for the book cover to be neat; it should attract the right people and give them a hint of what to expect. The latter is important. The book cover should give the viewer information about what kind of book it is in a few seconds. This makes the packaging one of the most important marketing decisions.

Creating a book cover that meets all requirements is an art. Therefore, the design of book covers is an area where it is common for micro publishers to hire professionals. When I asked in Forums, that’s what most people spend money on.

Do I have to pay for a book cover?

No. The right book cover helps to sell your book, but does it sell enough extra items to justify the cost? The answer to that question depends. If you have written down your memoirs for the family, it will probably never sell enough to justify an expensive cover financially. Then it may be worth it for other reasons.

No matter how much you spend on your book cover today, the cover will feel outdated in a few years because there are trends in cover design, which makes it a good idea to change book covers at regular intervals. If your book cover is not optimal today, you can make a better version later. It is not that bad idea because then you have more knowledge of how the readers perceive the book.

Choose a designer with style

The first step is to choose the right designer. The most important thing is finding a designer with a design language suitable for your book. When I published my first book, most cover designers were employed by major publishers. At least I had a hard time finding some when I googled (it may have been me using the wrong keyword). Today I get as many freelancers as I need. Many have posted a portfolio with examples of their works on their website. Another way is to get inspired with newly published books in the same genre as yours.

Start well before the release date

Once you have found one or more suitable designers, it is time to contact them, discuss your cover, and request a quote. You want to know price, terms and availability. It’s also not wrong to get a feel for how you communicate.

It is good to start with this well in advance of book publishing. You also want to know if the designer gives you the right to use the cover for different prints, editions and formats.

Keep the price down with a weel-thought order

The designer either charges a fixed price or hourly fee. Ask the designer to specify how many revisions are included in the fixed price. If the designer works on an hourly basis, the final price depends on how many changes you request. To avoid the rising bills and to respect the designer’s time, it is good to think about the kind of cover you want carefully so that you can place a clear order. There are some simple facts.

  • author-name
  • the book’s title
  • format, size and type of binding
  • possibly blurb (review quote) if you want it on the front
  • if it should be something special like embossing, UV varnish
  • Other things to send to the designer at some stage
  • Printed Book ISBN (to create the back cover)
  • publishing log
  • back cover
  • author photo in print format

You hire a designer because he or she is an expert at creating book covers that send the right signals. If the person in question is a professional, he or she also knows what’s trendy in the industry and what other books in your genre look like right now. It is this knowledge that you pay for. Therefore, it is wise to order an “attractive book cover” and not to delve into the details.

As a micro-publisher, we are faced with many decisions and choices. Sometimes it is a bit foggy in there or there are obstacles on the way but we overcome them. You pay for knowledge, not for execution. It’s better to think about the feelings than the details when giving instructions to your graphic designer. You want the “selling book cover,” not a “galloping white unicorn from the right with a red heart.”

Same applies when giving feedback. If you think your name looks too bad on the first sketch, don’t say “I want my name bigger” because then you will get just that. It’s much better to say, “can you make my name more visible?”. Then the designer can choose the best solution based on the conditions. Among the tools include changing the size (size), changing fonts, changing the color contrasts or moving the name to a more visible place on the cover. The result is guaranteed to be better than if you tie back your designer with too detailed instructions in your feedback.

If you are not completely satisfied with the overall impression, tell them what feels wrong and what impression you want instead. Do not try to solve the problem by providing detailed suggestions. It is the designer’s job to use his experience and knowledge to translate your wishes and not execute your instructions. Saying “move the unicorn half an inch to the left and mirror the harp” is the wrong feedback. It’s better to say that the cover looks creepy rather than romantic, that it appeals to the wrong age category or what you are now experiencing is the problem.

The result is better and it saves both you and the designer many gray hairs if you give feedback correctly. It is good idea to gather feedback from several sources before returning to the designer. Good questions to ask yourself at this stage:

  • Does the book cover appear to belong other similar books?
  • Does the cover stand out among other books in the same niche?
  • Does the cover give the right gut feeling to the content?

If you have hired the right designer and made a well-thought order, you should be able to answer yes to all the questions.

Good luck with your book cover!

Melissa.

SCRIVENER REVIEW [UPDATED FOR 2022]

SUMMARY

Scrivener is a desktop software that lets you compile all your research, character notes, and anything else you have to write your book in one user-friendly, convenient dashboard. I can describe it as a killer organizer tool that makes life so much easier for authors and writers. And it helps you avoid spending your most important asset: your time. This scrivener review is created for you to make an educated decision.

An important distinction to note that Scrivener isn’t a word processor like Microsoft Word. Rather it’s a tool whose main purpose is to support your writing by providing many valuable, smart, and unique features. 

It is a solution for all types of writers: best-selling novelists, screenwriters, students, academics, lawyers, journalists,  non-fiction writers, translators, and more. Scrivener is not there to teach you how to write but it simply provides everything you need to start writing and keep writing in a more efficient and educated way.

Although the app allows you to make edits like choosing fonts, justify text, and vary line spacing, that’s not where you’ll spend most of your time, it even can be a bit unproductive to focus on the final appearance of the document. It would be better to be brainstorming, work on the structure of your document, gathering reference information, and typing words. 

And when you’re finished, Scrivener can conveniently compile your work to a wide number of publishable and printable formats. And if you have been through any long-form writing process you would relate that such a tool saves you tons of time.

There are many ways you can use, customize this writing application to fit your needs as a writer. But with a small time investment in advance to learn, this tool could transform your entire world as a writer and self-published author.

Scrivener is available for Mac, Windows, and iOS, and will synchronize your work to each device you have. Scrivener is currently used by many writers at all stages of their careers. So It might be a very useful solution for you too taking into account that it is very affordable.

Get Scrivener 20% off by clicking here and enter the special discount code of GOGETSMARTER when purchasing.

SCRIVENER FAQs

What is Scrivener?

Scrivener is a desktop software that lets you compile all your research, character notes, and anything else you have to write your book in one user-friendly, convenient dashboard. I can describe it as a killer organizer tool that makes life so much easier for authors and writers. And it helps you avoid spending your most important asset: your time.

Is Scrivener free?

Scrivener is not free but offers a trial period. You can use all features for 30 days (not just 30 days from the date you install it). The trial version has exactly the same features as the full version but it will not work after 30 days of use. (If you use it every day, it lasts 30 days; if you use it only two days a week, it lasts fifteen weeks.)

How much does Scrivener cost?

The Scrivener Mac and Windows versions have a one-time cost of $49 ($41.65 if you’re a student or academic), and the iOS version is $19.99 (for iPad, iPhone, and iPod Touch). If you want to use Scrivener on both Mac and Windows you need to pay $80.

The latest version is Scrivener 3 and this Scrivener Review is based on latest version.

Note: No review is perfect so please let us know if you want to add any features to this Scrivener Review for 2022.

Important note: Scrivener 3 windows is still under development (at the time of writing this article). You can download the beta version here. The final Scrivener 3 windows release date is still not announced.

How to use Scrivener?

Scrivener offers quite a number of video tutorials (also available on YouTube), covering a range of topics from basic to advanced. 

Major online training providers also have full courses on how to use the Scrivener software to its maximum potential. We have checked several of them and I believe Learn Scrivener Fast is the best overall, but please do your own research.

Scrivener Review 2022

Scrivener is all about writing productively, and you will find below the important features of this amazing software.

1. Edit Your Script

The app provides a number of word processing features, it allows you to type, edit, and format words in ways you’re familiar with.

The toolbar on top of Scrivener’s Edit panel makes you choose the font, typeface, and font size of the text, make it bold, italic, or underlined, align it to the left, right, center, or justify it. Font and highlight colors are selectable, line spacing options, and a range of bullet and numbering styles are there in your service. So if you’re comfortable with Microsoft Word there will be no hassle here.

Images can be inserted into your script as drag and drop or from the Insert menu or paperclip icon. Images can be resized, but there is no image editing option inside the program.

We suggest not using fonts to format your text, but use styles. This way you choose the role the text plays (like title, heading, blockquote), rather than the way you want it to look. This is more flexible when it comes to publishing and exporting your script, and also helps in clarifying the document structure.

Note: No review is perfect so please let us know if you want to add any features to this Scrivener Review for 2022.

Keeping what writers need in mind, Scrivener lets you select a certain text block, and the number of words selected is displayed at the bottom of the screen, how cool is that:)

2. Give Structure To Your Document

Keep in mind that Scrivener offers many features that well-known word processors can not. That’s especially true when it comes to structuring your documents. That’s really handy and makes you write efficiently if you are dealing with long documents.

With Scrivener, you can break your document up into smaller pieces, and rearrange them hierarchically instead of displaying your document as one large one that you need to scroll up and down. Your specific project will consist of documents and subdocuments, and even folders. That makes you see the overall structure more easily, and you can rearrange the pieces as you wish. Scrivener offers two different ways to visualize all of this: outlines and the corkboard.

The ability to structure information in an outline and the efficient use of outlines is one of Scrivener’s greatest appeals to many authors. As you may see in the below screenshot, a tree view of your project is viewed on the left Editor pane. This is called the Binder.

This works similar to managing files or emails. You can view or edit any document by clicking on it, and rearrange the outline with drag-and-drop If you click on the blue Outline icon on the toolbar, you will see an outline of your project in the Editor pane on the right. This will show you a more detailed outline of the current document together with any subdocuments. In order to display the whole outline, you need to select the top item called “Draft” in my project.

Scrivener Review

Please note that the outline view provides several additional columns of information. You may customize the columns that are displayed.

The other way to get an overall view of your document is Corkboard, which can be found by the orange icon on the toolbar. This displays each section of your document as an index card.

Scrivener Review

If you rearranging these cards will rearrange the attached text in your document. It is possible to give each card a short synopsis to summarise the content in it (it may be an existing one or you plan to add). Corkboard will display cards for any subdocuments of the chapter you have chosen in the binder just like the Outline view.

Please don’t be inclined to type everything into a single document. Dividing a large writing project into smaller parts will be more efficient, will give you a better sense of progress, and the Outline and Corkboard will make you rearrange your project fast.

3. Tracking Your Progress

It can be useful and motivating to keep track of your progress, especially if you are writing a long document. If you have a bird’s eye view of which parts of a document have been finished, that will give you a sense of progress, and make sure that you didn’t miss anything. 

It is possible to add a different label to each section of the document. Scrivener uses colors for that purpose, but you can name them as you wish. In the below screenshot, a green label is added to any section that is completed. Then a column to display that label in the document’s outline is added.

Scrivener Review

An additional feature to track progress is Status. The status of any section of a document can be set to in progress, to do, revised draft, first draft, final draft, or done.

Just another way to track progress is the Goals or Targets sections. If your writing projects have a word count requirement, Scrivener’s Targets feature allows you to enter a word count target and deadline for your project, plus individual word targets for each document. You can set a word goal for your entire project.

BONUS For 20% off, buy through my link and use the code GOGETSMARTER.

And by clicking the Options button, set a deadline too.

Scrivener Review

If you click the bullseye icon at the bottom of each document, you can determine the character or word count for that specific document.

You can see how you’re doing at a high-level view by displaying Targets in the document outline along with a graph of your progress.

Scrivener Review

Scrivener also provides a wide selection of icons, Aas you see below screenshot the icon turned to green for each section completed.

Scrivener Review

It’s possible to include additional colors for the first draft, final draft, done, etc. It would be great to associate each document status with a different color icon, so when you change the status to Final Draft, the icon will automatically turn to green, but sadly that doesn’t seem possible.

Some people open an extra pane so they can view the Outline, Binder, and Editor all at the same time, and check the statuses/labels this way.

Note: Please let us know if you want to add any features to this Scrivener Review for 2022.

4. Research & Brainstorming 

One of the most important features of Scrivener is the way it allows you to work with reference material that’s separate from the words you are writing. If you are dealing with especially long and complex documents, keeping track of your research and ideas is very important. How Scrivener does this is also what separates it from competitors.

As we discussed before you can add different synopsizes to each document. That can be observed in the Outline and Corkboard, Inspector views, so you can go there to check as you type. And there’s a space to type some additional notes under the synopsis.

Scrivener gives you a dedicated section for your research in the Binder. It is possible to create your outline of ideas, web pages, and all types of other documents, and images/photos. If your document is short, it’s likely to keep the reference information open in your browser. But if you are working on a long document, there will be a lot of material to track, and the project will likely be long-term, so all those materials will need a more permanent space.

The reference section may contain Scrivener documents, which gives you all of the features you have when writing your actual project, including formatting.

It is also possible to attach reference information in the form of a web page, document, and images, just check the below screenshot.

Note: Please let us know if you want to add any features to this Scrivener Review for 2022.

Scrivener user manual is also very useful, which can be downloaded as a PDF document. 

5. Publishing the Finished Document

After you’re finished writing your document, Scrivener offers quite powerful and flexible publishing options. Like most writing solutions out there, Scrivener can export the document sections you select as a file in different formats.

But Scrivener’s real publishing power is in its Compile feature. This feature allows you to publish your document in paper or digital format in a number of popular document and ebook formats. There are many beautifully designed templates available, or you can choose to create your own design. You can export finished documents to Microsoft Word, upload them to Google Docs for final submission, proofreading, and editing.

Scrivener Alternatives

Scrivener is one of the best writing applications though there are alternatives. I will add more detailed reviews of alternatives as I get my hands dirty on some of them.

Conclusion

Writing is not easy and it is time-consuming, you need to do the planning, research, writing, editing, and publishing. Scrivener features are there to assist with each of these and give more power than its competitors.  Only the main features are discussed in this Scrivener Review, there a lot more of them for you to discover.

It is one of the best, powerful, and popular writing solutions, and I think the best for long writing projects. It is available as a stand-alone desktop application (no cloud versşon as of this writing) for Mac, Windows, and iOS.

The Scrivener Mac and Windows versions have a one-time cost of $49 ($41.65 if you’re a student or academic), and the iOS version is $19.99 (for iPad, iPhone, and iPod Touch). If you want to use Scrivener on both Mac and Windows you need to pay $80.

Scrivener has a bit of a learning curve but  It’s certainly not hard to learn, it is a complete professional solution offering a wide range of features than its competitors. You don’t need to know everything before you begin, just start using it and you will learn everything you need along the way. 

Their support is responsive, provides fast turnaround time, and is knowledgeable. They have video tutorials, user manuals, user forums, and FAQs.

If you’re ready to see how it can work for you, grab your copy for Mac (or for PC) here and use my special code GOGETSMARTER for 20% off.

All the best

Melissa Mayer

PS: You may want to check following articles too.

Amazon Keyword Research Explained Step By Step

Tips For Book Cover Design

Book Title Generators List (2020)